Subscribing Customers to Plans

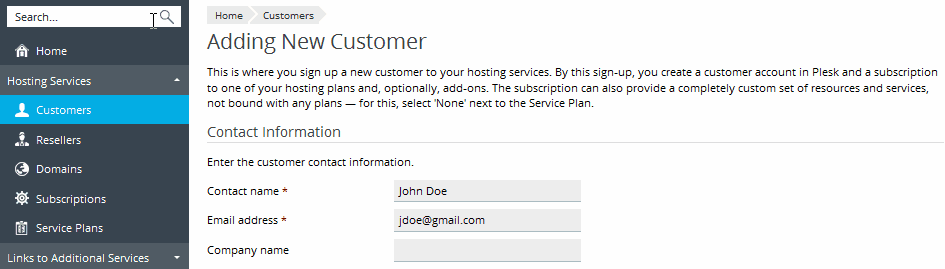
If you do not use billing automation, then to start serving a customer in Plesk, you should create a customer account and subscribe the customer to a service plan. Any user can be subscribed to several service plans simultaneously, meaning that they will have several service subscriptions, some of which may be custom, and some of which may be associated with different add-on and service plans.

Subscribing a new customer generally means creating the customer account together with their first subscription. However, you can also create customer accounts without subscriptions. This can be useful if you do not need to set up a website for a customer at the moment, and want to transfer a subscription from another customer account, or set up a subscription later. Note that customers without subscriptions cannot log in to the Control Panel.

To create a new customer account without a subscription:

  1. Go to Customers, and click Add a Customer.

    Customer_create

  2. Specify the customer's contact and billing information, Customer Panel account's username and password.
  3. Clear the Create subscription for the customer checkbox.
  4. Click OK.

To subscribe a new customer to a service plan and, optionally, add-ons:

  1. Go to Customers, and click Add a Customer.
  2. Specify the customer contact/billing information, user name and password, and attributes of the domain linked with the subscription.
  3. Select a service plan with which the subscription should be associated.
  4. Select add-on plans if you wish to add any.
  5. Leave the Proceed to customizing the subscription checkbox cleared.
  6. Click OK.

    Customer_subscribe

To subscribe a new customer to a service plan and add-ons on specific terms (customize subscription associated with plans):

  1. Go to Customers, and click Add a Customer.
  2. Specify the customer contact/billing information, user name and password, and attributes of the domain linked with the subscription.
  3. Select a service plan and add-ons.
  4. Select the Proceed to customizing the subscription checkbox.
  5. Click OK.

    The customer account and the subscription will be created, and Plesk will offer to customize such subscription properties as resources and permissions. Customizing hosting, mail, DNS service parameters is not available in the Server Administration Panel.

  6. Customize the subscription properties.
  7. Click Update & Lock.

    The customized subscription will get locked for syncing, it will not be synced with the service plan or add-ons in case they change. For details, refer to the section Relationship Between Plans and Subscriptions.

To subscribe a new customer to your services on specific terms (create custom subscription):

  1. Go to Customers, and click Add a Customer.
  2. Specify the customer contact/billing information, user name and password, and attributes of the domain linked with the subscription.
  3. Select None next to the Service plan.

    The subscription properties will be set according to Plesk default service plan.

  4. Leave the Proceed to customizing the subscription... checkbox selected.
  5. Click OK.

    The customer account and their custom subscription will be created. For details on custom subscriptions, refer to the section Relationship Between Plans and Subscriptions.

    Plesk will offer to customize such subscription properties as resources and permissions. Customizing hosting, mail, DNS service parameters is not available in the Server Administration Panel.

  6. Customize the subscription properties.
  7. Click OK.

To add a subscription to host your own websites and mail:

  1. Go to Subscriptions, and click Add Subscription.
  2. Specify attributes of the domain provisioned with the subscription, service plan and add-ons.
  3. Optionally, select the Proceed to customizing the subscription... checkbox.
  4. Click OK.

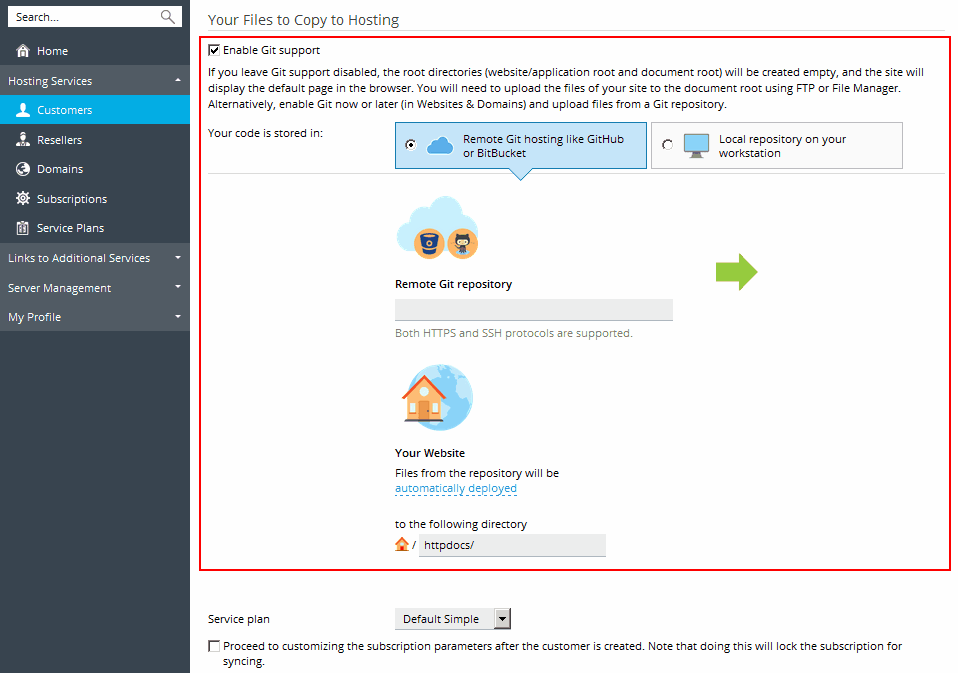
To enable Git support for transferring files to hosting:

  1. Go to Subscriptions, and click Add Subscription.
  2. Specify attributes of the domain provisioned with the subscription, service plan and add-ons.
  3. In the Your Files to Copy to Hosting section select Enable Git support.

    Plesk will create a Git repository for the subscription's domain. This repository will be used for transferring the files to a target public directory. You can select one of two types of Git repository depending on where your code is stored in:

    1. Remote git hosting like GitHub or BitBucket. In this case, you send the changes to this remote repository, and then Plesk pulls them from the remote repository and deploys to your web site. This scenario may be useful if you already work with some remote repository in GitHub (github.com) or BitBucket (bitbucket.org).
    2. Local repository on your workstation. In this case, you send the changes from your local repository to Plesk, and then Plesk deploys the changes to your web site.
  4. Specify the Git repository properties (for details, refer to Git support).
  5. Click OK.

Note: You can leave Git support disabled and add Git repository later, in the domains's settings.

Create_customer_git