Fail2Ban Jails Management
Advanced users might also be interested in configuring the way the so-called Fail2Ban jails are used to block IP addresses. A Fail2Ban jail is a combination of a filter and one or several actions. A filter defines a regular expression that matches a pattern corresponding to a failed login attempt or another suspicious activity. Actions define commands that are executed when the filter catches an abusive IP address.
A jail can have active or inactive status. When Fail2Ban service is running, only active jails will be used to monitor the log files and to ban suspicious IP addresses.
In Plesk, there are preconfigured jails for all hosting services (web server, mail server, FTP server, and so on). Most of them work in the same way: they detect failed login attempts and block access to the service for ten minutes. These jails are listed at the Jails tab at Tools & Settings > IP Address Banning (Fail2Ban).
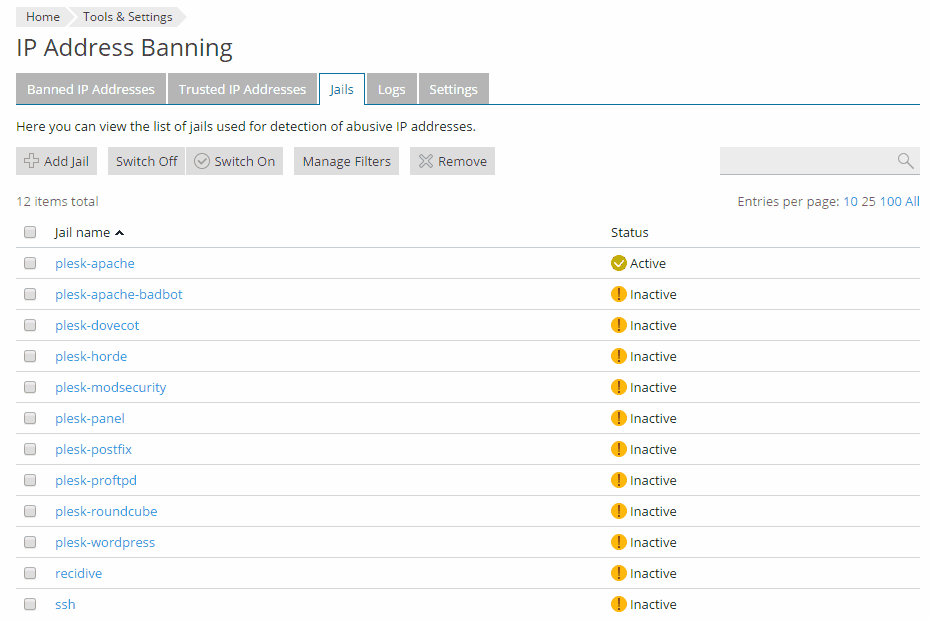
The following preconfigured jails are available:
- plesk-apache looks for Apache authorization failures and bans attackers for 10 minutes.
- plesk-apache-badbot looks for email grabbers and vulnerability scanners in Apache’s access log files. The ban lasts for two days.
- plesk-dovecot looks for Dovecot IMAP, POP3, and Sieve authentication failures and bans attackers for 10 minutes.
- plesk-horde and plesk-roundcube detect webmail login failures and block access to a web service for 10 minutes.
- plesk-modsecurity bans the IP addresses detected as harmful by the ModSecurity Web Application Firewall. The jail can only be activated if ModSecurity is already running, and will ban attackers even if ModSecurity is operating in the "Detection only" mode. The ban lasts for 10 minutes.
- plesk-panel detects Plesk login failures and bans attackers for 10 minutes.
- plesk-postfix looks for Postfix SMTP and SASL authentication failures and bans attackers for 10 minutes.
- plesk-proftpd looks for ProFTPD login failures and bans attackers for 10 minutes.
- plesk-wordpress looks for WordPress authentication failures and bans attackers for 10 minutes.
- recidive looks for other jails' bans in Fail2Ban's own log. It blocks hosts that have received a ban from other jails five times in the last 10 minutes. The ban lasts a week and applies to all services on the server.
- ssh looks for SSH login failures and bans attackers for 10 minutes.
Preconfigured jails for non-installed Plesk components are not shown in the list. For example, if RoundCube webmail is not installed, the plesk-roundcube jail is not shown in the list of available jails.
To protect your services from specific threats, as well as to protect third-party services that are not shipped with Plesk, you might want to set up your own jails, switch them on and off, update jail settings, and add filters that can be used by jails.
Activate or Deactivate a Jail
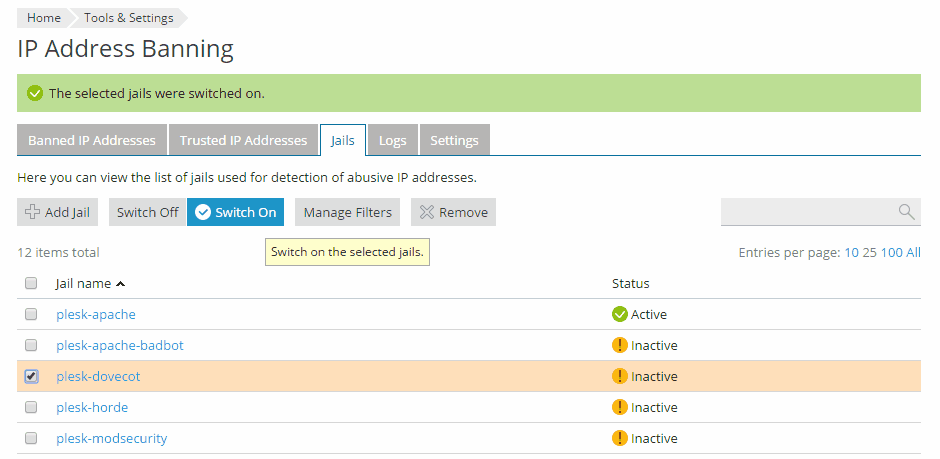
To activate a jail:
- Go to Tools & Settings > IP Address Banning (Fail2Ban) > Jails.
- Select a jail and click the Switch On button. This button is available only when the Fail2Ban service is running (the Enable intrusion detection check box is selected on the Settings tab).
Note: If you try to switch on several jails at once with a group Switch On operation and one of the jails fails to start, then all the jails will not be started. In this case, switch on the jails one by one.
To deactivate a jail:
- Go to Tools & Settings > IP Address Banning (Fail2Ban) > Jails.
- Select a jail and click the Switch Off button.
Configure Jail's Settings
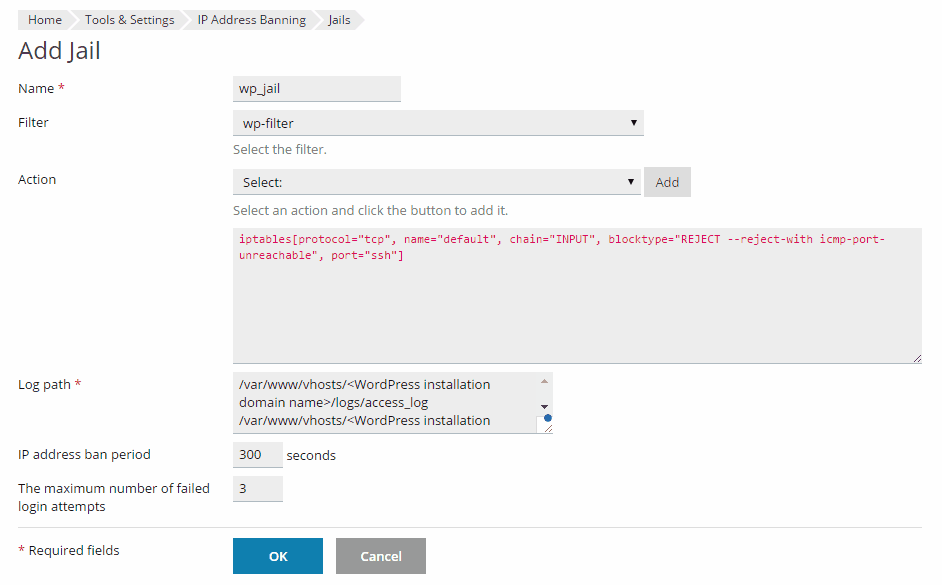
To set up a new jail:
- Go to Tools & Settings > IP Address Banning (Fail2Ban) > Jails > Add Jail.
- Specify the filter.
You can use the following filters already set up in Plesk:
- apache-auth, for Apache authorization failures
- apache-badbots, for spam bots and bad web crawlers
- plesk-courierlogin, for Courier IMAP and POP3 authentication failures
- plesk-dovecot, for Dovecot IMAP, POP3, and Sieve authentication failures
- plesk-horde, for Horde webmail authentication failures
- plesk-modsecurity, for attacks against web applications detected by the ModSecurity Web Application Firewall
- plesk-panel, for Plesk authentication failures
- plesk-qmail, for QMail SMTP authentication failures
- plesk-roundcube, for Roundcube webmail authentication failures
- plesk-wordpress, for WordPress authentication failures
- postfix-sasl, for Postfix SMTP and SASL authentication failures
- proftpd, for ProFTPD login failures
- recidive, for hosts repeatedly banned by Fail2Ban
- sshd, for SSH login failures
You can also add your own filter. For details, see the Manage Filters section below.
- Specify the jail action.
You can use the following actions, which are already set up in Plesk:
- iptables, to ban an attacker on a single port
- iptables-allports, to ban an attacker on all ports
- iptables-multiport, to ban an attacker on multiple ports
- sendmail, to send email notification to a specified email address
Select an action from the Actions menu and click Add to add it to the jail. You can add any number of actions to a jail. Actions can be customized for your needs, for example, you can specify a particular email address for sending notifications or specify the ports that should be closed.
- In the Log path field, specify one or more log files Fail2ban will check for the signs of an attack.
- Set the IP address ban period in seconds.
- Set the number of failed login attempts.
- Click OK.
To change settings of an existing jail:
- Go to Tools & Settings > IP Address Banning (Fail2Ban) > Jails , click the jail's name, and then click Change Settings.
- Edit the jail's settings and click OK.
To remove a jail:
- Go to Tools & Settings > IP Address Banning (Fail2Ban) > Jails.
- Select a jail and click Remove.
Note: Jails shipped with Plesk cannot be removed, you can only deactivate them. However you can remove the jails that you added yourself.
Manage Filters
To add a filter that can be used by a jail:
- Go to Tools & Settings > IP Address Banning (Fail2Ban) > Jails > Manage Filters > Add Filter.
- Specify the filter name and the regular expression used to match the lines of log files. For details about Fail2Ban filters, refer to Fail2Ban documentation at http://www.fail2ban.org/wiki/index.php/MANUAL_0_8#Filters. As Fail2Ban is a Python application, for details about Python regular expressions, refer to Python documentation at https://docs.python.org/2/library/re.html.