Note: This topic describes the Extensions Catalog available in Plesk Onyx 17.0. If you are running Plesk Onyx 17.5 or later, refer to the Extensions Catalog topic instead.
Using extensions is another way of increasing the functionality of your Plesk. Extensions are functional components developed by Plesk or third parties.
The extensions can be easily installed, removed, and configured directly from Plesk (the Extensions item in the navigation pane).
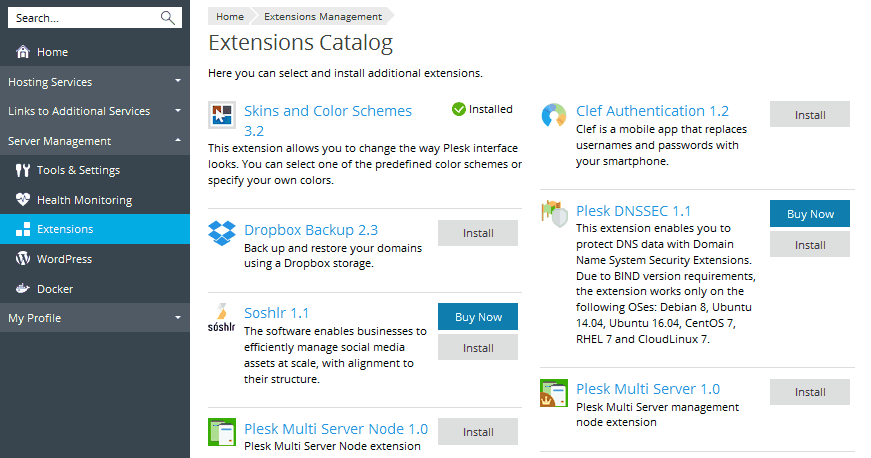
To install additional extensions from Plesk partners, go to Extensions > Extensions Catalog, or visit the http://ext.plesk.com website. You can prohibit the installation of individual extensions.
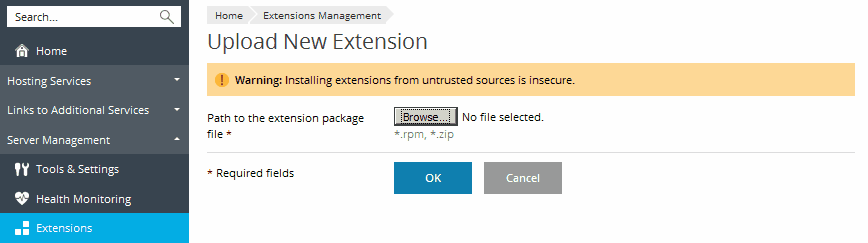
You can also upload an additional extension not included into the Extensions Catalog as a .zip archive.
Learn more about installing Plesk extensions in the Deployment Guide, in Installing Plesk Extensions.
The Extensions Catalog in the Plesk UI (Extensions > Extensions Catalog) represents the catalog that is found at http://ext.plesk.com. It contains the extensions provided by Plesk and its partners and include antivirus protection software, advanced backup solutions, and much more.
You can disable the Extensions Catalog and remove the Extensions Catalog button from the Plesk GUI. To do so, add the following lines to the panel.ini file:
[extensions]
catalog.enabled = off
A number of extensions are also available directly from the Plesk Installer (available from the Plesk extensions section at Tools & Settings > Updates and Upgrades > Add/Remove Components ). Extensions installed using the Plesk Installer are checked every time Plesk is upgraded. Extensions that have updates available are updated automatically, and those that are not compatible with the version of Plesk being installed are removed.
You can also upload an additional extension not included into the Extensions Catalog as an .rpm or a .zip archive. To do this, go to Extensions and click the Add Extension button. Then select an archive with the extension and click OK.
Note: Installing extensions from sources other than the Extensions Catalog can be insecure.
To switch on or switch off the automatic upgrade of Plesk extensions, go to Extensions > Settings and select Automatic upgrade of Plesk extensions.
Another way is to use the server_pref command-line utility. To switch off automatic upgrades, run:
plesk bin server_pref --update -disable-upgrade-extensions true
To switch on automatic upgrades, run:
plesk bin server_pref --update -disable-upgrade-extensions false
Plesk runs the maintenance task that checks for upgrades and automatically installs them. The task runs once a week. If you want to upgrade extensions manually before a week has passed from the previous check, use the corresponding link in Extensions > Settings.
It is important to keep all software installed on the server up-to-date. During the Plesk upgrade all installed extensions are checked for upgrades as well, and all available upgrades are installed automatically.
Some extensions may be incompatible with the latest version of Plesk and stop working after the upgrade, or even interfere with the Plesk operations. For that reason, during the Plesk upgrade all installed extensions are checked for compatibility with the version of Plesk being installed. All incompatible extensions are disabled automatically.
To manually check for upgrades for installed extensions, go to Extensions > Settings and click Check for upgrades now.
To prohibit installation of one or more particular extensions, list the name aliases of these extensions in the panel.ini file. For example:
[extensions]
blacklist = "nat, aast-apf, dropbox-backup, route53"
To find out the name alias for a certain extension, refer to the Extensions Catalog (http://ext.plesk.com). Name aliases are displayed there as part of extension URLs. Each URL conforms to the following pattern: https://ext.plesk.com/packages/<guid>-<package-name>, where <package-name> is a name alias.
For example, this URL tells us that the alias for NAT Manager is nat:
(https://ext.plesk.com/packages/90a20ade-9d3c-4ac5-82ea-20e8e0cd54de-nat).
To disable one or more installed extensions, select the corresponding checkboxes, and click Disable. Disabled extensions are marked with the![]() icon. Disabling an extension makes it unavailable to customers, and also deactivates its hooks.
icon. Disabling an extension makes it unavailable to customers, and also deactivates its hooks.
To enable one or more installed extensions that have been disabled, select the corresponding checkboxes, and click Enable.
Some extensions featured in the Extension Catalog require a paid license to operate. The license can be purchased from the Plesk interface by clicking Buy Now.

By default, when the Plesk administrator clicks the button, they are taken to the Plesk Online Store (typically, the URL starts with https://go.plesk.com/), where they can complete the purchase. However, if you want to sell the extension licenses in your own online store, the URL can be changed.
To change the URL of the online store used in the "Buy Now" links, add the following lines to the panel.ini file:
[extensions]
buyUrl = "https://shop.com"
where "shop.com" is the domain name of your online store.