Note: This topic describes the Extensions Catalog available in Plesk Onyx 17.5 and later. If you are running an earlier version of Plesk Onyx, refer to the Plesk Extensions topic instead.
Plesk extensions are independent modules that add new functions and features to Plesk. They are created both by Plesk and numerous Plesk partners (in fact, anyone can create and publish their own Plesk extension in the Extensions Catalog using the publicly available documentation). You can install any number of extensions on your Plesk server.
Plesk extensions can only be installed by the Plesk administrator. Some extensions add functions that can only be used by the Plesk administrator, while others add additional capabilities to reseller and customer accounts.
All extensions in the Plesk Extensions Catalog, whether published by Plesk, a Plesk partner, or a third party are rigorously vetted and tested. You can always rely on them to be 100% safe. However, you must be careful with extensions that come from other sources. Plesk recommends you only install extensions from sources you trust.
In short, some are and some are not. The extension's author determines whether the extension is free or paid, chooses the licensing model, and sets the price.
A number of extension licensing models are available:
The Extensions Catalog is an online repository of Plesk extensions that is publicly available at https://ext.plesk.com/. You can also access the Extensions Catalog from Plesk by clicking Extensions in the navigation pane.
The Extensions Catalog UI in Plesk Onyx 17.5 differs from the one in Plesk Onyx 17.8.
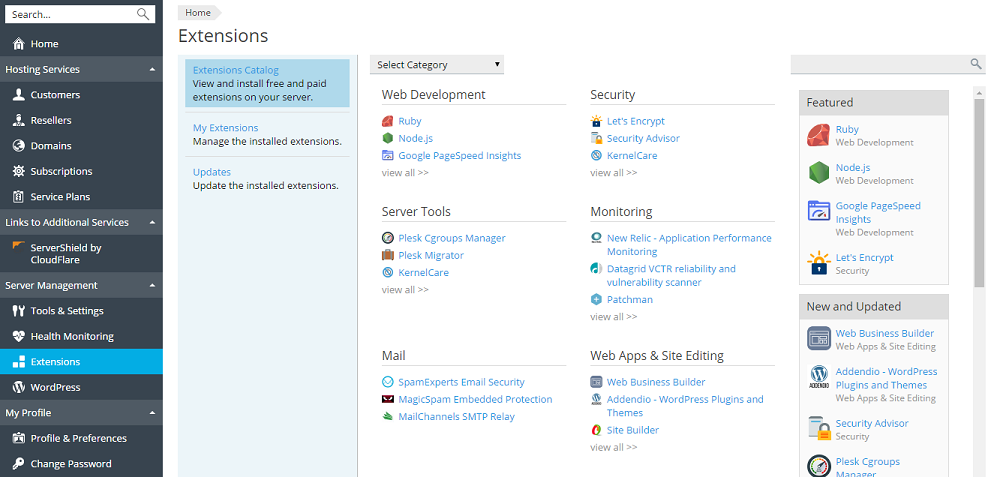
After clicking Extensions in the navigation pane, you will land right on the Extensions Catalog tab. Here you can access a wealth of extensions that add all kinds of functions and features to Plesk. Extensions are sorted into categories, such as "Backup", "DNS", or "Mail". Every extension belongs to one or more categories.
Featured extensions are displayed on the landing page. However, many categories contain more extensions that can be displayed. To find a specific extension, use the search function (the search window is located in the top right corner).
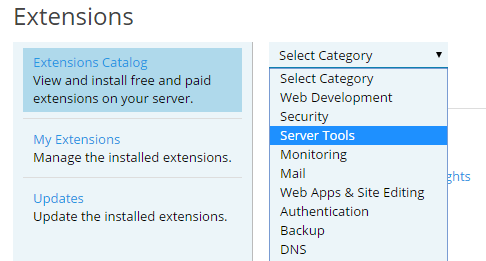
If you do not know the name of the extension you are looking for, look for the "Select Category" menu and select the category you think the extension is most likely to belong to.
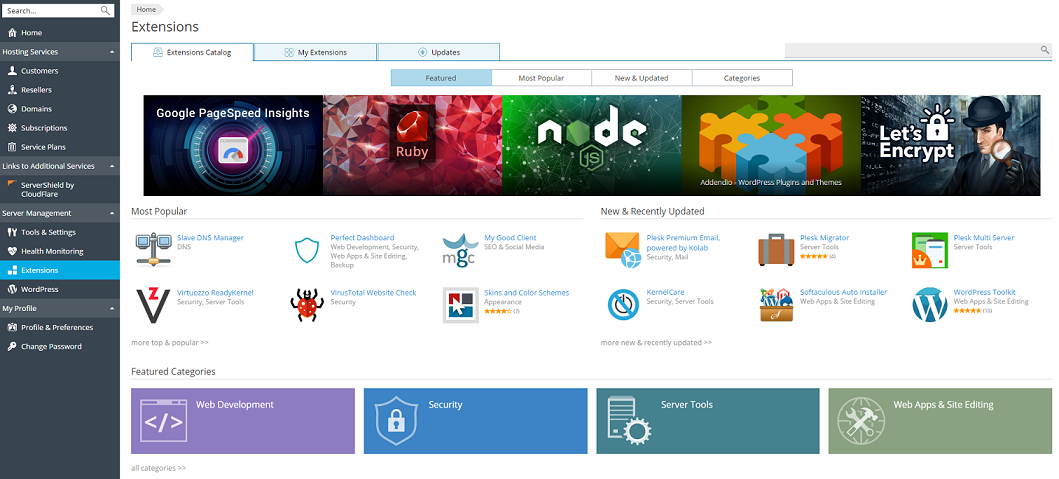
After clicking Extensions in the navigation pane, you will land right on the Extensions Catalog tab, the Featured screen. Here you can access a wealth of extensions that add all kinds of functions and features to Plesk. Extensions are sorted into four groups, each one found on its own screen accessible from the Extensions Catalog tab:
Banners at the top of the screen display featured extensions. Click a banner to browse the corresponding extension. Below you can see previews of three other screens.
The extensions that have been rated the highest by the Plesk community are displayed here.
The extensions that have been published or updated most recently are displayed here.
All extensions are sorted into categories. The Featured screen displays the following Featured Categories: "Web Development", "Security", "Server Tools", and "Web Apps & Site Editing". The Categories screen displays all categories and extensions that belong to them. Every extension belongs to one or more categories.
To find a specific extension, use the search function (the search window is located in the top right corner).
If you do not know the name of the extension you are looking for, go to the Categories screen and select the category you think the extension is most likely to belong to.
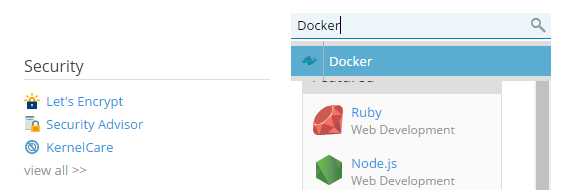
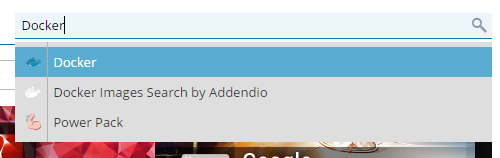
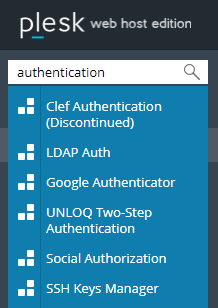
Alternatively, you can find specific extensions using the Plesk global search located in the top left corner.
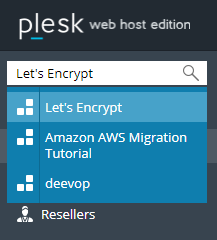
The Plesk global search shows both installed and non-installed extensions:
If you do not know the name of the extension you are looking for, you can use the Plesk global search function to search for the extension by the category you think the extension is most likely to belong to.
All extensions installed in Plesk are displayed in Extensions > My Extensions. In Plesk Onyx 17.8, you can customize the “My Extensions” screen by rearranging the extensions. You can create your own layout of the “My Extensions” screen.
To customize the “My Extensions” screen:

No extension to suit your taste? You have two options:
Plesk Onyx 17.5
Click Extensions and look for the "Request Extension" section in the bottom right corner.
Plesk Onyx 17.8
Go to Extensions > Categories and look for the "Let us know if you couldn't find the extension to suit your needs." section at the bottom of the screen.
Click the "Let us know" link, and you will be taken to the Plesk UserVoice page. There, you can leave a request describing the extension you are looking for. Other Plesk users may vote for your request, and the more votes it receives, the greater the chance that Plesk will create and publish the extension you request. However, please note that regardless of the number of votes, the final decision about whether to create the extension remains with Plesk. Plesk will also not give any guarantees or ETAs.
To learn more about an extension, locate it in the Extensions Catalog and click the extension name.

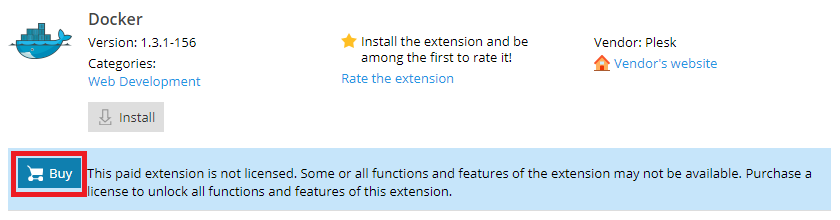
On the extension's page, variety of information about the extension is available. Pay attention to the following:
Many extensions also provide one or more useful links:
While most Plesk extensions can be installed and function equally well on both Linux and Windows servers, some can only work on one or the other. Other extensions may lose some of their functions and features if installed on a specific OS.
In addition, every extension has a minimum Plesk version it can operate on, and will not work if installed on a server running an earlier Plesk version. For example, an extension requiring " Plesk 12.0 +" will work on Plesk 12.0, Plesk 12.5, and Plesk Onyx, but not on Plesk 10.4.
When installing extensions from the Extensions Catalog, extensions for which you do not meet the installation requirements are not displayed. When installing an extension from a file, you need to make sure that the installation requirements are met. To learn about an extension's installation requirements, look it up in the Extensions Catalog or contact the extension's vendor.
To install an extension from the Extensions Catalog, follow these steps:
To install an extension from a file, follow these steps:
Caution: Installing extensions from sources other than the Extensions Catalog can be insecure, and may allow a third party to compromise your server. Never install extensions from sources you do not trust.
If you install a paid extension, you may need to purchase a license to take advantage of some or all features and functions it provides. You can purchase a license on the extension's page by clicking the Buy button.
If you are unsure whether an extension requires a license or not, read the extension's documentation or contact the extension's vendor.
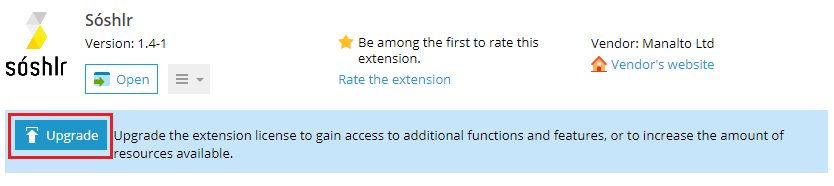
In Plesk Onyx 17.8 and later, certain extensions allow you to upgrade the installed license. This can help you to:
To upgrade an extension's license:
Okay, you have installed an extension - now what? This depends on the extension in question. Some Plesk extensions can operate out of the box, and some require configuration before they can be used. The way you operate an extension and take advantage of the functions and features it provides varies from extension to extension.
If you are unsure how to use the extension you have installed, read the extension's documentation or contact the extension's vendor. If you have installed an extension but are unable to make use of one or more advertised features, make sure that you are running the latest version of the extension and update it, if necessary.
Many extensions have a number of configurable settings. The exact settings vary greatly from extension to extension. Usually, they govern the way the extension behaves, but sometimes they present the entirety of the extension's interface (that is, you need to go to the extension's configuration screen to operate it).
To change the settings of an installed extension, follow these steps:
If you are unsure what a specific option or setting does, read the extension's documentation or contact the extension's vendor.
After an extension is published, its vendor can release updates that bring new features, security improvements, bugfixes, and more. Updates for extensions are always free, and Plesk recommends keeping all installed extensions up-to-date.
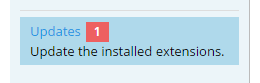
To see if there are any updates available for the installed extensions, click Extensions in the navigation pane. When updates become available for one or more installed extensions, a notification is displayed on the "Updates" tab. The number within the red square indicates the number of extensions for which updates are available.
To see which extensions can be updated, go to Updates.
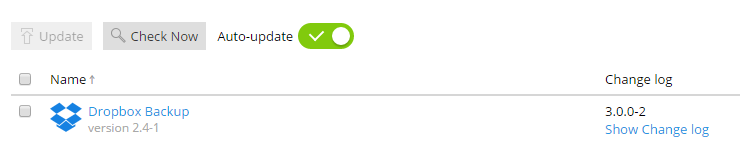
The important information here is the name of the extension, the version that is currently installed, and the version that is available. You can click "Show Change Log" to see a list of bugfixes and improvements that will be delivered with the update.
When an update for an extension is released, if automatic update is enabled on the server, the extension is updated within a week. If you do not want to wait, you can update the extension manually.
By default, automatic extensions update is enabled. This means that once a week, Plesk checks for updates for all installed extensions and automatically installs all updates that are found. If you need to update an extension immediately, check for updates manually, as described later in this topic.
If you are concerned that installing an update may disrupt the operation of an extension, or you want to test the updated extension in a staging environment first, you may want to disable automatic update. To do so, click Extensions in the navigation pane, go to Updates, and then click the green "Auto-update" slider.

If you change your mind, click the gray slider to turn automatic update back on.

To update an installed extension manually, follow these steps:
Note that the procedures described above are only suitable for extensions that are present in the Extensions Catalog. The only way to update an extension not found in the Extensions Catalog is to upload a newer version of the extension as a file.
Plesk Onyx 17.8 uses extensions promos to suggest extensions you may want to try. The promos are context-dependent and are only displayed on certain Plesk pages. For example, you can see promos of extensions related to backups (such as Perfect Dashboard and Dropbox Backup) on the Tools & Settings > Backup Manager screen.
To install a promoted extension, click Install. If the extension is paid, click Buy to buy a license.
If you do not want to see these promos, add the following lines to the panel.ini file:
[ext-catalog]
contextAds = off
If you want to temporarily stop using an installed extension without removing it, you can disable it. You may want to disable an extension, for example, in one of the following situations:
Disabling an extension preserves its configuration and data, but removes all controls associated with it from the Plesk interface. The exact consequences of disabling an extension differ depending on the extension in question.
To disable an installed extension, follow these steps:
To enable a disabled extension, follow these steps:
If you no longer want to use an installed extension, you can remove it. When you remove an installed extension, all extension data are removed (what exactly is considered extension data varies from extension to extension - see the examples below for reference). In addition, when an extension is removed, all controls associated with it are removed from the Plesk interface.
Plesk recommends that before you remove an extension, you should disable it for a few days. If you notice no adverse effects during this time, you can safely remove the extension.
Caution: When an extension is removed, all data for that extension are irrevocably lost.
To remove an installed extension, follow these steps:
The exact consequences of removing an extension differ depending on the extension in question. Here are a few examples:
.htaccess) made by the extension will not be reverted.