2. Access Your Mailbox
Er zijn twee manieren om toegang tot een postvak te krijgen voor het verzenden en ontvangen van e-mailberichten:
- Gebruik webmail voor e-mail vanuit de webbrowser.
- Set up and use an email client program on your computer.
Setting up Email Clients
Plesk can automatically set up certain email clients (for example, Microsoft Office Outlook, Mozilla Thunderbird, and others). This feature is called mail autodiscover. It automatically configures necessary settings (mail protocols, mail servers, ports, and so on) and you do not need to specify them manually. However, not all domain configurations support mail autodiscover.
If your domain does not support mail autodiscover or you want to use email clients other than those that support mail autodiscover, set up an email client manually. Typically, you will need to specify the following settings:
- Gebruikersnaam. In dit veld geeft u uw volledige e-mailadres op. Bijvoorbeeld janjansen@voorbeeld.nl.
- Wachtwoord. Hoogstwaarschijnlijk is dit het wachtwoord voor uw e-mailaccount.
- Protocol mailserver. Dit bepaalt of u kopieën van berichten op de server wilt laten staan of niet. Om kopieën op de server te laten staan selecteert u de optie IMAP. Als u geen kopieën op de server wilt bewaren, selecteer dan POP3. Als u IMAP selecteert kunt u het SpamAssassin-spamfilter trainen aan de hand van de e-mailberichten die u ontvangt, ervan uitgaand dat SpamAssassin op de server is ingeschakeld.
- Server voor inkomende mail (POP3/IMAP). Geef hier uw domeinnaam op. Bijvoorbeeld voorbeeld.nl. De poort voor POP3 is 110. De poort voor IMAP is 143.
- Server voor uitgaande mail (SMTP). Geef hier uw domeinnaam op. Bijvoorbeeld voorbeeld.nl. De poort voor SMTP is 25. Voor deze server is authenticatie vereist.
To see the settings necessary for setting up an email client,
go to Websites & Domains > the domain whose email you want to access via an email client > Mail Accounts > the  icon.
icon.
Raadpleeg de subsecties van dit hoofdstuk voor gedetailleerde instructies voor het instellen van populaire e-mailprogramma’s om met uw postvak te werken.
Known Issues and Limitations of Mail Autodiscover
Mail autodiscover does not work for:
- Domains that do not have web hosting.
In some cases, mail autodiscover does not work for domains with SSL (HTTPS) enabled:
Domains are not secured with valid SSL/TLS certificates (for example, self-signed ones). To enable mail autodiscover via HTTPS, secure your domain and the mail server with a paid SSL/TLS certificate from a trusted certificate authority or with a free certificate from Let’s Encrypt. To secure the mail server, go to Websites & Domains > your domain > Mail > the “Mail Settings” tab, next to “SSL/TLS certificate for mail”, select the valid SSL/TLS certificate, and then click OK.
Domains have wildcard subdomains (those that have the asterisk prefix
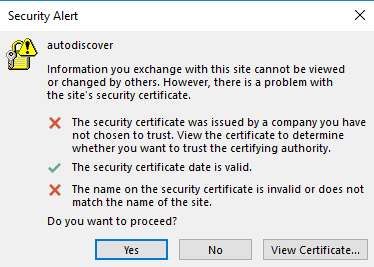
*) in the DNS settings. To enable mail autodiscover via HTTPS for these domains, create a wildcard subdomain in Plesk, get a wildcard SSL/TLS certificate, and secure the following with this certificate: the domain itself, the mail server, and the created wildcard subdomain. To secure the wildcard subdomain, go to its Hosting Settings and choose the wildcard certificate (the one that has the asterisk prefix*). Choosing the wildcard certificate for the wildcard subdomain is necessary because it will otherwise use the self-signed Plesk SSL/TLS certificate by default (even if a wildcard certificate was issued). If you do not choose the wildcard certificate for the wildcard subdomain, you will see a warning message during mail autodiscover. In Microsoft Office Outlook, the message looks like this:
Notitie
Als u geen toegang tot uw postvak kunt krijgen via de aanwijzingen in dit deel van de handleiding, dan kan dit te maken hebben met de manier waarop de mailserver is ingesteld. De mailserver kan bijvoorbeeld zijn beveiligd met een SSL/TLS-certificaat, waardoor het nodig is om een ??specifieke domeinnaam te gebruiken voor zowel inkomende als uitgaande e-mail. Het kan ook zijn dat de e-mailserver een niet-standaard poort gebruikt, dat de toegang tot de juiste poorten is geblokkeerd, enzovoorts. Neem contact op met uw hostingprovider om het probleem op te lossen.
