Configuring ASP.NET (Windows)
ASP.NET is a flexible set of tools and web development technologies that allows you to employ a number of applications based on ASP.NET framework. Plesk supports 2.0 and 4.x versions of the ASP.NET framework, as well as ASP.NET Core 1.0 and allows configuring most of its settings. Most ASP.NET configuration settings that commonly need to be customized in order for ASP.NET applications to function in a desirable way can be edited through Plesk.
To configure the server-wide ASP.NET settings:
Go to Tools & Settings > ASP.NET Settings (in the Applications group). The settings for different versions of ASP.NET are located under the corresponding tabs.
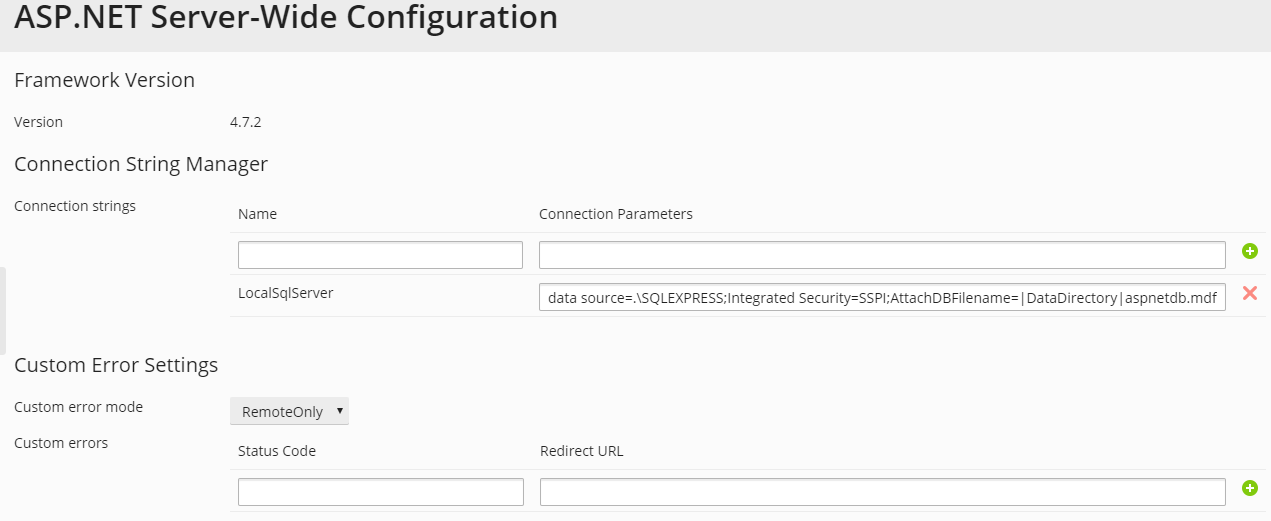
Set up the strings that determine database connection data for ASP.NET applications which use databases. This option is available only for ASP.NET 2.0.x.
When you open the ASP.NET configuration page for the first time, sample connection parameters with common constructions are displayed. You can delete them and specify your own strings.
- To add a string, enter the required data into the Name and
Connection Parameters input fields and click
 next to them.
 - To remove a string, click
 next to it.
- To add a string, enter the required data into the Name and
Connection Parameters input fields and click
Set up custom error messages that will be returned by ASP.NET applications in the Custom Error Settings field:
To set the custom error messages mode, select an appropriate option from the Custom error mode menu:
- On - custom error messages are enabled.
- Off - custom error messages are disabled and detailed errors are to be shown.
- RemoteOnly - custom error messages are displayed only to remote clients, and ASP.NET errors are shown to the local host.
To add a custom error message (which will be applied unless the Off mode was selected), enter the values in the Status Code and Redirect URL fields, and click
.- Status Code defines the HTTP status code resulting in redirection to the error page.
- Redirect URL defines the web address of the error page presenting information about the error to the client.
Due to possible conflicts, you cannot add a custom error message with an error code that already exists, but you can redefine the URL for the existing code.
To remove a custom error message from the list, click
 next to it.
Configure compilation settings in the Compilation and Debugging field:
To determine the programming language to be used as default in dynamic compilation files, choose an entry from Page default language list.
To enable compiling retail binaries, leave the Enable debugging checkbox empty.
To enable compiling debug binaries, select the Enable debugging checkbox. In this case, the source code fragments containing error will be shown in a diagnostic page message.
Note
When running applications in debug mode, a memory and/or performance overhead occurs. It is recommended to use debugging when testing an application and to disable it before deploying the application into production scenario.
Configure encoding settings for ASP.NET applications in the Globalization Settings section:
- To set an adopted encoding of all incoming requests, enter an encoding value into the Request encoding field (default is utf-8).
- To set an adopted encoding of all responses, enter an encoding value into the Response encoding field (default is utf-8).
- To set an encoding which must be used by default for parsing of
.aspx,.asmx, and.asaxfiles, enter an encoding value into the File encoding field (default is Windows-1252). - To set a culture which must be used by default for processing incoming web requests, select an appropriate item from the Culture list.
- To set a culture which must be used by default when processing searches for a locale-dependent resource, select an appropriate item from the UI Culture list.
Set a code access security trust level for ASP.NET applications in the Code Access Security field.
CAS trust level is a set of restrictions applied to an app. For example, the Low level restricts app’s network capabilities (like sending mail) while the Full trust level removes any restrictions.
To allow changing the CAS trust level for websites, select the checkbox Allow changing the CAS trust level for individual websites. If you do not select this checkbox, websites will use the server-wide setting. Otherwise, each website will be able to have its own CAS trust level specified in the website’s hosting settings.
Note
When an assembly is assigned a trust level that is too low, it does not function correctly. For more information on the permissions levels see https://msdn.microsoft.com/en-us/library/Aa302425
Set client session parameters in the Session Settings field:
- To set up the default authentication mode for applications, select an appropriate item from the Authentication mode list. Windows authentication mode should be selected if any form of IIS authentication is used.
- To set up time that a session can remain idle before it is abandoned, enter the appropriate number of minutes into the Session timeout field.
Click OK to apply all changes.
Note
Plesk supports separate configurations for different versions of the .NET framework.
Note
If you want to use ASP.NET Core 1.0 web applications, select the .NET Core Runtime and the ASP.NET Core components when installing Plesk. After that, you can upload your ASP.NET Core 1.0 application to your web site and use it. In this case, it is recommended to switch off the ASP.NET support for your domain (go to Websites & Domains > Hosting Settings and deselect the Microsoft ASP.NET support option) to save the server resources.