Panel.ini Configuration File
Certain aspects of the behavior of both Plesk and various Plesk
extensions cannot be managed via the GUI, XML API, or the command line.
Instead, they are governed by entries in the panel.ini configuration
file. For example, by editing this file, you can:
- Forbid logging in to Plesk using ‘root’ or ‘Administrator’ credentials.
- Hide an IP address registered in Plesk, so that it does not appear in the interface and cannot be assigned to subscriptions or resellers.
- Specify a custom URL for the Extensions Catalog, and so on.
The panel.ini file can be found here:
- (Plesk for Linux)
/usr/local/psa/admin/conf/panel.ini - (Plesk for Windows)
%plesk_dir%\admin\conf\panel.ini
If the file is missing on your server, create an empty file at the
specified location and name it panel.ini. You can also rename the
panel.ini.sample file found in the same directory to panel.ini.
This way, the file will contain a number of pre-configured settings you
can use for reference.
Configuring Settings in panel.ini
To configure settings via the panel.ini file, you need to edit it in
either of the two ways:
- Edit the
panel.inifile using a text editor. - Install the Panel.ini
Editor extension
and use it to edit the
panel.inifile in the Plesk GUI.
Regardless of the option you choose, to configure one or more settings via the panel.ini file, you need to add entries to it according to the following pattern:
[Section name]
Setting name = Value
Note
If a setting accepts a boolean (‘yes’ or ‘no’) value, you can use either ‘true’, ‘on’, or ‘yes’ to enable it, and ‘false’, ‘off’, ‘no’, or ‘none’ to disable it.
Changes take effect immediately after saving the file. There is no need to restart any services.
For example, to disable IP Address Banning (Fail2Ban), add the following lines to the panel.ini file:
[fail2ban]
enabled = false
As a result, IP Address Banning (Fail2Ban) disappears from the Security group on the Tools & Settings screen, and you can no longer manage it via CLI commands.
Every setting that can be configured via the panel.ini file belongs
to a pre-defined section. To customize a setting, you must place it in
the panel.ini file within the section to which it belongs. Do not
include any individual section more than once. If you want to customize
multiple settings belonging to a single section, include it once and
place all settings you want to customize within it.
For example, to customize the URL for the application catalog and to
enable application catalog customization, add the following lines to the
panel.ini file:
[aps]
catalogUrl = "http://example.com"
catalogsCustomization = on
To configure settings via the Panel.ini Editor extension, go to Extensions > My Extensions > Panel.ini Editor > Open.
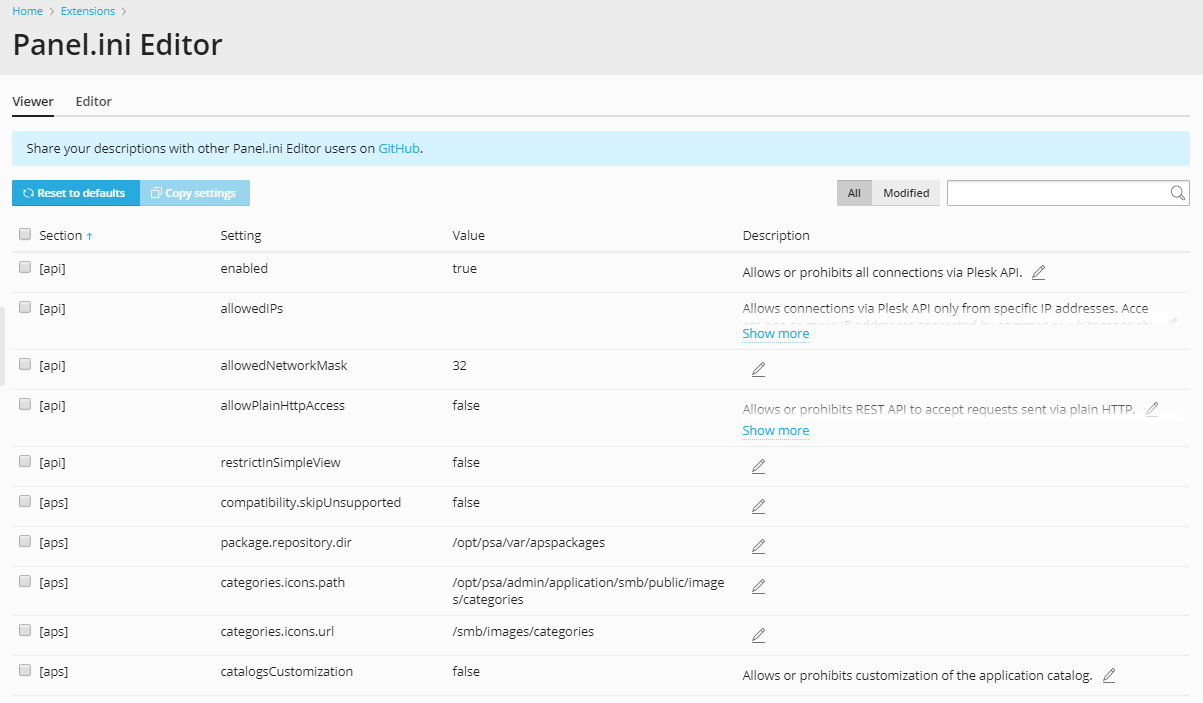
Here, on the “Viewer” tab, you can see the complete list of all settings
that can be managed via the panel.ini file, broken down by section.
The “Setting” column displays the machine-readable parameter name,
the “Value” column displays its currently assigned value, and
the “Description” column can show the description of a setting.
You can easily tell which settings were added to the panel.ini file:
their values are shown in bold,
and their default value is shown in parentheses
after the currently assigned one.
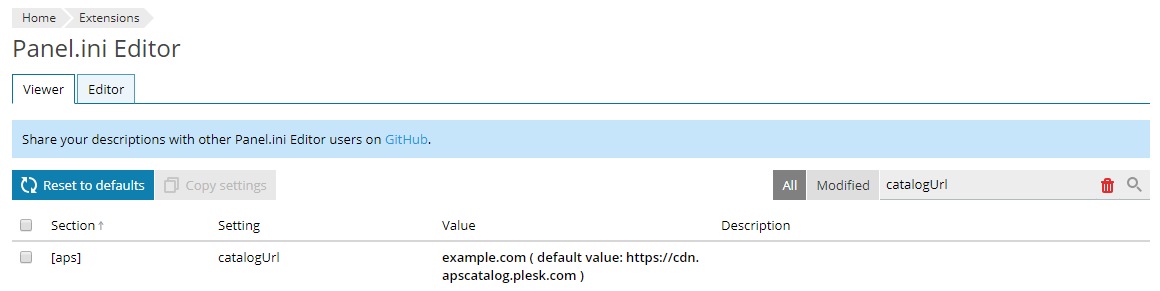
For example, on the screenshot below, the setting catalogUrl was
assigned the value http://example.com instead of the default one
(http://cdn.apscatalog.plesk.com).
Note
Certain settings have no default values. For these settings,
only the currently assigned value is displayed
even if the settings were added to the panel.ini file.
To see only those settings that were added to the panel.ini file,
click Modified. To return to the full list of settings, click All.
You can also search for a specific setting using the search box.
To add settings to the panel.ini file via Panel.ini Editor:
- Go to Extensions > My Extensions > Panel.ini Editor > Open.
- Select one or more settings that you want to add to
panel.iniand click Copy settings. You can select settings that belong to the same section or different sections. - Go to the “Editor” tab and click Paste settings. Panel.ini Editor will paste the copied setting or settings.
- Click Save to save the current
panel.iniconfiguration.
Descriptions of panel.ini Settings
Some settings in Panel.ini Editor have descriptions. When Panel.ini Editor is installed or updated, you receive the descriptions that were approved by the Plesk team. However, you can also fill in the missing descriptions or edit the existing ones yourself.
Note
When Panel.ini Editor is updated, it preserves both new descriptions added by you and the changes you made to default descriptions.
Note
If you feel that other Plesk users can benefit from your descriptions, share them! Approved descriptions become available to other Panel.ini Editor users. Read how to share the descriptions.
To edit descriptions of settings in Panel.ini Editor:
- Go to Extensions > My Extensions > Panel.ini Editor > Open.
- Click the
 icon in the row of a setting which description you want to fill in or edit.
 - Type the description and then click
 to save changes.
Editing panel.ini via Panel.ini Editor Using Presets
You can make switching between different configurations easier using presets.
A preset is a configuration of panel.ini settings,
which is created once and then can be loaded
on demand without the necessity to manually add or remove settings.
To create a preset:
- Go to Extensions > My Extensions > Panel.ini Editor > Open.
- Go to the “Editor” tab and edit the
panel.inifile to create the desired configuration. - Click Add, give the preset a name, and then click Save.
The preset was created. You can now load the desired configuration of settings at any time by loading the preset.
To load a preset:
- Go to Extensions > My Extensions > Panel.ini Editor > Open.
- Go to the “Editor” tab.
- Click Load and select the desired preset.
- The “Editor” tab now shows the configuration of settings
that were saved in the preset. Click Save to apply it to the
panel.inifile.
Now the panel.ini file contains the chosen configuration of settings.
You can delete unneeded presets by clicking Delete and selecting the preset that you want to delete.
Restoring the Default Settings
To restore a setting customized via the panel.ini file to its
default value, open the file for editing and either remove the
corresponding line or comment it out by adding the ‘;’ character at the
beginning of the line, like this:
[fail2ban]
; enabled = false
The setting reverts to the default value immediately after saving the file.
To restore all settings customized via the panel.ini file to their
default values, do one of the following:
- Log in to the server via SSH or RDP and remove or rename the
panel.inifile. - Open the Panel.ini Editor extension and click Reset to defaults.
Reference
Here are some customization user scenarios that can be implemented via the panel.ini file. Note that the list is not exhaustive. The behavior of certain Plesk extensions can be customized via the panel.ini file - refer to the extensions’ documentation for details.
- Disable logging in to Plesk using the root or administrator credentials
- Specify which MySQL privileges must be available to the different database user roles, or deny certain MySQL privileges to all database users
- Customize Let’s Encrypt settings, such as the number of days before expiration when the certificate is scheduled for auto-renewal, or the size of the RSA private key
- Resell Plesk extensions from your own online store
- (Plesk for Linux) Disable the system updates tool, or allow enabling the installation of potentially unsafe updates
- Disable extensions’ promos
- Protecting against clickjacking
- Protecting against open redirect
- Restricting remote access via XML API
- Hiding icons of social networks of Social Login