Reselling Extensions
Selling Plesk Licenses with Extension Licenses
Use this method if you want to sell clean Plesk instances together with a number of commercial extensions. This method does not support the in-app purchasing scenario.
Implementation details
- You need to have both Plesk and the extensions you want to resell available for purchase in your online store.
- When a customer places an order, you need to contact KA via the KA Partner API and request licenses for the ordered items.
- KA will create the requested licenses and send you a single
activation code for these licenses. Note that KA has two versions of
the Partner API: v1 and v3.
- Partner API
v1
(obsolete, not recommended):
- Can request both the main Plesk key and multiple additional keys for extensions in a single call (see createKey()).
- Uses a single activation code for both the main Plesk license and all additional license keys.
- Partner API
v3
(recommended):
- Can request only one key (either the main Plesk key or an additional key for an extension) in a single call (see Creating a License Key).
- Uses a single activation code for both the main Plesk license and all additional license keys (additional keys requested in separate API calls are attached to the main license. The activation code for the main Plesk license will activate all attached additional keys as well).
- Partner API
v1
(obsolete, not recommended):
- After your store receives the activation code, you can either give the code to the customer (via the online store UI or email). Alternatively (and preferably), you can activate the licenses by running a CLI command on the Plesk instance you have created for the customer. You can activate licenses via CLI using the “license” utility (Plesk for Linux, Plesk for Windows).
In-app Extension Upsell
Use this method if you want to upsell extensions in your online store for already provisioned Plesk instances. When one of your customers clicks the “Buy Now” button in the extension catalog in Plesk, they are taken to your online store where they can complete their order.
Integration with KA
- When a customer places an order, you need to contact KA via the KA Partner API and request a license for the purchased extension. Pass the main Plesk key number as an argument in the API call.
- KA will create the requested extension license and attach it to the main Plesk license.
- You can use either Partner API v1 or v3 to request the licenses:
- Partner API v1 (obsolete, not recommended): Create an extension license and attach it to the main Plesk license in a single call (see createKey())
- Partner API v3 (recommended): Create an extension license and attach it to the main Plesk license in a single call (see Creating a License Key)
After you order an extension license via the Partner API, it is attached to the main Plesk license. The extension license will be installed on Plesk server the next time Plesk connects to KA to update the main Plesk license (typically, this takes from one day to one month). The customer can also perform the following steps to install the extension license immediately (this could be done in your online store UI, for example):
- Click Tools & Settings in the left navigation pane.
- Click License Management (under Plesk).
- Click Retrieve Keys to install the new license key in Plesk.
Forwarding customers to your online store
By default, when a customer clicks the “Buy Now” button in the extension catalog in Plesk, they are taken to Plesk store, not your store. You can change this behavior by specifying your own store hostname in the panel.ini file. Once the store hostname has been customized, all “Buy Now” links and other possible upsell links displayed inside the extensions will lead to your online store.
To change the URL of the online store linked to by the “Buy Now” links,
edit the panel.ini file and add the following line in the
[extensions] section:
[extensions]
buyUrl = "https://shop.com"
where “shop.com” is the domain name of your online store.
Here’s an example of how it would work:
The original URL used by an extension:
https://go.plesk.com/buy-plesk-ext/some-extension-name?kn=PLESK.12345678.0001&token=U29NZVVuaXF1ZUdVSUQxMjM%3D&product-id=SomeProductID
The modified URL used by an extension once you have specified your store hostname in the
panel.inifile:https://shop.com/?extension-id=some-extension-name&kn=PLESK.12345678.0001&token=U29NZVVuaXF1ZUdVSUQxMjM%3D&product-id=SomeProductID
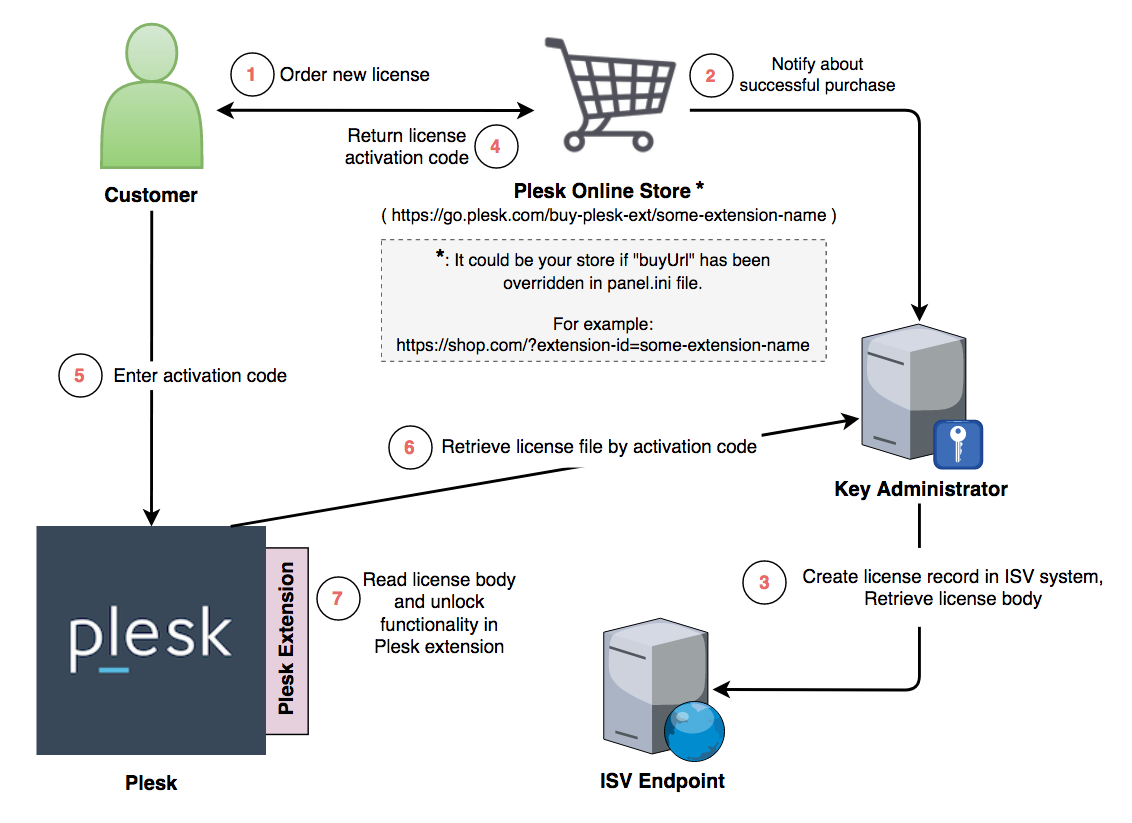
The license purchase workflow would look like the following for “Single Offer” and “Multiple Offers” licensing models:
Now, every time a customer clicks the “Buy Now” button, they are taken to your online store. Make sure that your online store can handle the parameters passed in the modified URLs:
| Parameter Name | Example | Description |
|---|---|---|
extension-id |
extension-id=some-extension-name |
The ID of the extension. Find the list of extensions and their IDs (“codes”) here. Choose the appropriate Partner API constant for the requested extension and include it in the Partner API call. The list of Partner API constants is available here: Please note that “Extension ID” corresponds to |
kn |
kn=PLSK.12345678.0001 |
The main Plesk key number. Pass this key number as the parent key number in the Partner API call. |
token |
token=U29NZVVuaXF1ZUdVSUQxMjM%3D |
Optional parameters. Required only for the “Individual Offers” licensing model. With this licensing model, website owners can purchase products and services by themselves as needed. This is done by adding a link in the Plesk UI that allows end users to place orders. First, the end user selects the desired website, then selects the desired product among the products offered by the extension, and then proceeds to the online store to complete their order. The Note that “Extension ID” and “Extension Product ID” corresponds
to The
|
product-id |
product-id=SomeProductID |
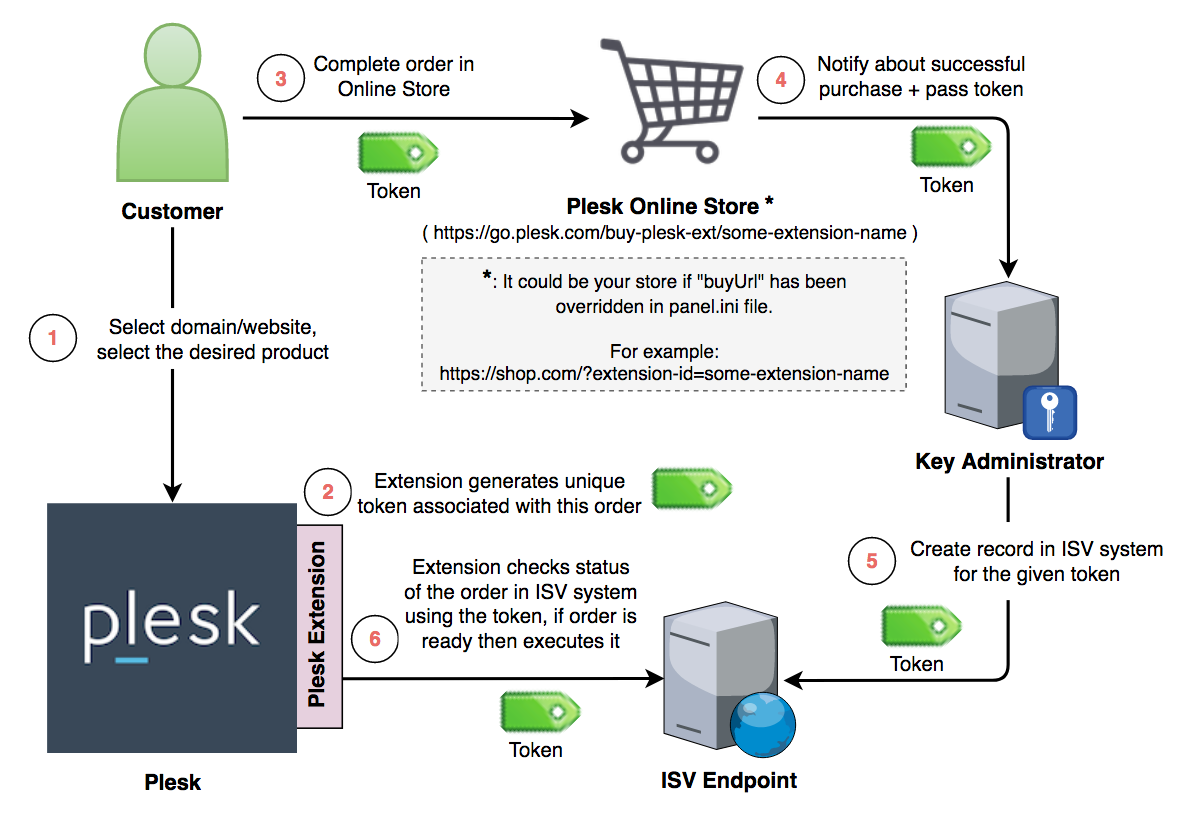
Here is how license purchase workflow would look like for “Individual Offers” licensing model:
Note
This feature will only affect extensions sold by Plesk that use “go.plesk.com” as the destination hostname. If an extension is sold directly by an ISV, its “Buy Now” links and other possible upsell links will not be affected.
How to control which extensions you want to show and sell
Once you have changed the URL for the “Buy Now” links as described above, all commercial extensions, including those that will be added to the Extension Catalog in the future, will lead to your store, even if you have not set them up yet. You can make sure that your customers will only see the commercial extensions that you are ready to sell by configuring a smart proxy server for the Plesk Extension Catalog. This proxy server will take the Extension Catalog feed, filter out the extensions that you are not ready to sell, and provide the modified feed to your Plesk instances.
Implementation details:
Set up a server (physical or virtual) where the proxy script will be running.
Download the proxy script to the server. This link contains the instructions explaining how to deploy and operate the script.
Configure the proxy to pass through only those commercial extensions that should be visible on your Plesk servers. The proxy works as a whitelist – you need to specify the IDs for the commercial extensions that should be displayed in Plesk; nothing else will be visible.
Note
The proxy only affects the extensions whose “Buy Now” links point to https://go.plesk.com. Free extensions and extensions whose “Buy Now” buttons point elsewhere are not filtered by the proxy. They will be visible in the Extension Catalog on your Plesk servers regardless of the proxy settings.
Change the URL of the extension catalog feed on all your Plesk servers to make it point to the proxy server’s address. This is done by adding the following line to the panel.ini file:
[extensions]
catalog.url = http://<proxy-address>:8080
When a new commercial extension becomes available in the Extension Catalog and you have set up your store to sell it, modify the proxy by adding the corresponding extension ID so that this extension is passed through and is available to your customers. Note that the catalog feed is cached on Plesk servers. New extensions will not appear immediately.
The picture below shows how the proxy script can be used with the Extension Catalog:
