Settings and Tools for Webmasters
This section describes how to do the following:
- Change website name, description, and keywords.
- Change the contact information that is used on the site.
- Upload a site icon (favicon) for your website.
- Make your website more visible in search results, and embed various search engine services.
- Prevent certain pages or areas of your website from being indexed by search engines and shown in search results.
- Notify site visitors about the use of non-essential cookies on your site. This might be of interest only to webmasters residing in the European Union.
Changing Website Name, Description, and Keywords
Website name is a line of text that is shown in the title bar of a user’s browser when they visit your website. By default, it is “My website”, but you can change it to anything you want.
Website description is shown by search engines when your website is listed in search results. Website keywords are analyzed by search engines and are used for displaying your website when people search for these keywords.
You can specify the site description and keywords that the editor will use for all pages of your website (in Settings tab > Basic), and specify custom values for specific pages (in Pages tab > page name > Edit page description and keywords).
To edit your website name, description, and keywords:
Go to the Settings tab > Basic tab.
Specify the website name that your visitors will see as the title of their browser window when they visit your website.
To show both your website name and the current page name in the browser title window and to increase your website recognition in search engine results, select the Add website name to page titles checkbox.
Add short description (up to 255 symbols) of your website.
Provide a list of keywords that describe your website (10-15 keywords are recommended).
The description and keywords will be used by default for new and existing pages.
Click OK to save changes.
Changing Contact Information
The contact information and company name that you specified in the first step of creating your site are shown in the relevant places and elements of the site, such as About Us, Contact Us pages, and in Map modules. You can change this information in all respective locations at once (by editing the values in the Settings tab > Owner Info), or you can manually overwrite each value by editing text on the pages.
Uploading a Site Icon (Favicon)
A favicon is a small icon displayed in the browser’s address bar when you visit a website, and also appears next to the website name in the list of favorite bookmarks. You can create a favicon using a variety of online tools and then upload your favicon through the Presence Builder editor. All your website visitors will see this favicon.
To upload a favicon for your website:
- Go to the Settings tab > Basic tab.
- Click Browse and select the location of the favicon to upload. The favicon will be uploaded.
- Click OK to save changes.
To remove a favicon from your website:
- Go to the Settings tab > Basic tab.
- Click Remove in the Favicon section. The favicon will be removed.
- Click OK to save changes.
Verifying Website Ownership
Most search engines require you to verify website ownership when you register your website or sign up for webmaster assistance services. Verification is typically done by uploading or creating a file with a specific file name.
To verify website ownership:
- Go to the Settings tab > Advanced tab.
- Provide the verification file:
- If you know the name of the verification file requested by a search engine, provide the verification file name in the Create verification file field and click OK. Presence Builder will create it in the correct place.
- If you have already downloaded your verification file from a search engine, upload the verification file to the Upload verification file field and click OK.
- After the verification file is created or uploaded and your website is published, confirm your ownership on the search engine website.
- Click OK to save changes.
To edit the HTML <head> section of your website (for example, to
add ownership verification meta code):
Go to the Settings tab of the Presence Builder’s main menu, then go to the Advanced subtab.
Click Edit Metadata.
Insert the code into the provided field and click Add.
Note
Only valid HTML tags permitted for
<head>section by HTML standards are supported. Metadata changes will be available only after you publish your website.Click OK to save changes.
Embedding Analytics Code
An analytics service is a tool that allows you to obtain information about your visitors. After you register with an analytics service, such as Google Analytics, and acquire the required code, you can embed the analytics service on your website.
To embed an analytics service:
Register with an analytics service and acquire the code.
Go to the Settings tab > Advanced tab.
Click Embed Analytics.
Insert the code you have received from the analytics service into the provided field and click Add.
Note
The analytics service will start working only after you publish your website.
Click OK to save changes.
Downloading the Sitemap
Some search engines will ask you to provide your sitemap for analysis and optimization purposes. You can download your sitemap from the Presence Builder editor.
To download your website sitemap:
- Go to the Settings tab > Advanced tab.
- Click Download Sitemap.
- Click OK to start downloading the
sitemap.xmlfile.
Preventing Search Engines from Indexing Certain Pages of Your Site
To prevent search engines from indexing certain pages of your website,
you can add the appropriate directives into the robots.txt file.
This file is stored on the customer account to which your site is
published.
To prevent search engines from indexing certain areas of your website:
Go to the Settings tab > Advanced tab.
Click the link Edit robots.txt.
Type your directives into the input field. Place each directive on a new line.
For example, to prevent all search engine robots and crawlers from indexing the contents of the directory
/privateand the file/my_secret.htmlon your customer account, add the following lines:User-agent: * Disallow: /private/ Disallow: /my_secret.html
For more information about the robots.txt file and directives you
can use, refer to http://www.robotstxt.org/robotstxt.html.
Notifying Site Visitors About the Cookie Policy
If you are located in the European Union, your site must inform its visitors about the use of non-essential cookies and obtain informed consent.
Cookies are small files that web servers save on visitors’ computers. Cookies may be used for a number of purposes, from remembering personal preferences to tracking users’ behavior for presenting targeted advertisements. Non-essential cookies are those that are not required for websites to function properly. Examples of non-essential cookies include those from analytics, advertising, and affiliate networks such as Google Analytics and Google AdSense.
Most likely, your site uses non-essential cookies if it uses the following functions:
- Google Analytics
- Publishing to Facebook
- Embedded video
- Online store module
- Map module
- Commenting module
- Social sharing module
- Script module
- Site search
If you choose to show a notice on the site, its visitors will be prompted to confirm that they accept your policy.
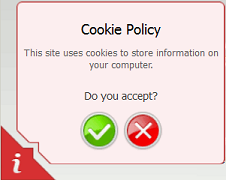
If they accept it, the notice is no longer shown (the icon
 is shown instead in the page corner), and they can
continue browsing your site. If they do not accept it, they are taken to
google.com.
is shown instead in the page corner), and they can
continue browsing your site. If they do not accept it, they are taken to
google.com.
To show a cookie notice on the site:
- Go to the Settings tab > Advanced tab.
- Click the link Notify Site Visitors About the Cookie Policy.
- Select the checkbox Show the cookie notice on the site and click OK.